Wednesday, November 27, 2019

Healthy Granola Bars


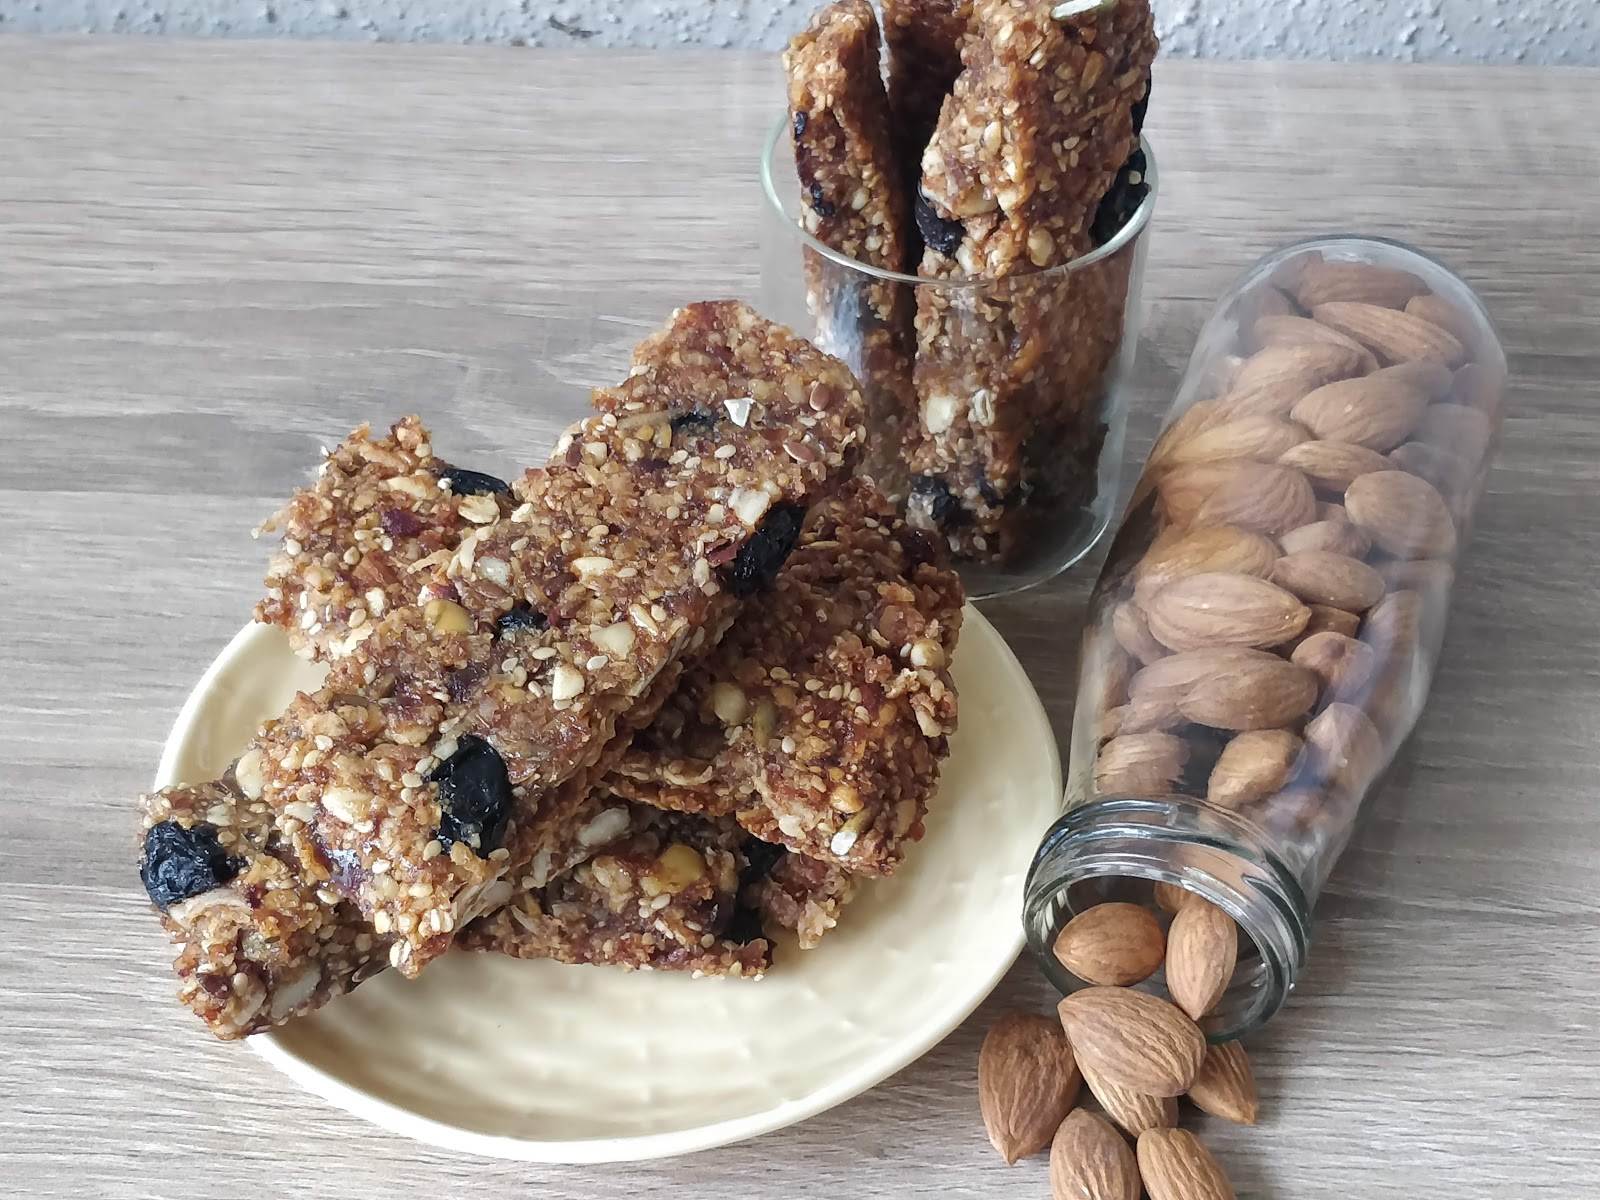
They are super healthy, delicious and just heavenly!!! My homemade granola bars are super healthy, loaded with nutrition’s, delicious and travel friendly too. Flavor of seeds and dry fruits, loaded with fiber and protein…. It’s a sweet treat for everyone. Whether it is dry fruits or seeds, chocolate or nuts, sugar or jaggery, salt or sweet, believe me the possibilities are endless. 


These baked bars are chewy and soft packed with power and cleaner ingredients, much way better than store brought.  You can customize this recipe however you like. You can add a number of things into this. These are good snack options, absolutely kid friendly as I have added dates and jaggery instead of white or brown sugar. Kids will love to eat this with milk & they can carry it as snack in school tiffin. 

Healthy & powerful ingredients


Personally, I love jaggery very much and use it as much as I can. It sweetens our food in a healthy manner. Jaggery is unprocessed and unrefined form of sugar. Jaggery is useful to bind the ingredients in any recipe and have medicinal properties too. Oats have lots of fiber, which is good for you, and there is protein in the granola bars from the nuts. Dates are the best natural sweetener because they are loaded with fiber and essential minerals, rich in antioxidants. Work as an energy booster too.

Natural sweeteners


Homemade granola bars are healthier than store-bought, because you know everything that is going into them. It has no chemicals, preservatives or any added colors. 

Let’s jump to the ingredients….


Oats                                                  1 cup
Almonds                                           ½ cup
Cashew                                             ½ cup
Pumpkin seeds                                  1/4th cup
Water melon seeds                            1/4th cup
Sesame seeds                                    1/4th cup
Flax seeds                                         1tbs
Peanut (roasted and crushed)            1/4th cup
Rajgira /Ramdana/Amarnath             1/4th cup
Dates                                                 1 cup
Black raisin                                       ½ cup
Desiccated coconut                           ½ cup
Jaggery                                              1 cup
Ghee/clarified butter                         1 & ½ tbs


Instructions


Preheat your oven to 180°C then line baking tray with parchment paper, set aside.

1. In a pan over medium heat dry roast all the dry ingredients one by one for 2-3 minutes.

2. Crush or pulse the cashew, peanuts and almonds for a few seconds in a processor (not to powder everything, just to crush). You can chop also in small pieces.

3. In a large bowl, combine all the nuts, seeds, coconut, flax, means all the dry ingredients including soaked raisins. Stir to combine.

4. In a pan, add ghee or clarified butter to melt the jaggery. Once the jaggery melts, add the date puree. Boil the whole mixture, keep stirring to prevent burning. Put off the heat once the mixture gets thickened. (Syrup consistency)

5. How to make the date puree? Grind the seedless soaked dates in a grinder, with little water for 3-5 minutes or until you have a smooth, uniform paste.

6. Add the paste of dates and jaggery into the dry ingredients. Mix it with the help of your hands or spatula, mix everything till well combined.

7.  Transfer the granola mixture into the prepared baking tray and spread it out evenly using the back of any glass or bowl or with a spatula.

8. Bake the granola bars for 25 - 30 minutes, or until the top is nice and golden brown.

9. Once the bars are out of the oven, let it cool completely. Cut into desired pieces. Keep these bars in refrigerator to set for at least 1-2 hours.

10. Store in an airtight container in the fridge.  

          Tips & Tricks

1. Store these bars in the fridge. You may want to wrap them in a piece of parchment paper before putting them in a container or plastic bag in the fridge so that they don’t stick together.

2. Always dry roast the ingredients for better taste and flavor.

3. It’s really important to press the granola mixture into the pan. The harder and longer you press these bars, the less possibilities to break it up after baking or while cutting.
4.    The jaggery and date mixture will really help with keeping the bars together. (It’s important for binding the bars together)
5. Finally, after baking the bars I would recommend refrigerating the granola bars for about 1 hour. This step will harden everything. Refrigeration will make the bars hard. They do soften at room temperature.


Enjoy this homemade baked version of power packed granola bars. I am sure You are going to love these bars. If you try this recipe I would love to see it. Please share this recipe with your friends and family. Let me know your opinion & request.

Here is the  video link for the recipe  https://youtu.be/k-dPWMnvKO4


Website link for more videos  https://www.addanky.com/recipes


Thursday, October 17, 2019

                 SEMOLINA & WHOLE WHEAT BREAD 


Bread baking is one of the wonderful and fun thing which you can do in your kitchen. Baking bread fills my kitchen with divine and delicious aroma. Homemade breads only require simple ingredients, little time and lots of patience. Baking bread at home is much healthier choice, gives good taste & the most important fact that we know exactly what we are eating & adding into our bread, no preservatives, no color additives. Each and every step of baking a bread like kneading, stretch and fold, bubbly yeast, first and second rise etc., fills your heart with joy and pleasure.  The most satisfying thing is to watch your loaf grow.


Semolina bread is one the easiest recipe and my favorite too. I always wanted to bake tall and high rise bread, and this is only possible when you are using all-purpose flour (in India we called it Maida) which is not a healthy choice among many people. So, I was in hunt of some other substitute of it, and found semolina. Believe me, this is the best bread recipe I ever made. You can blindly trust on this super fine and magical flour Semolina.  Semolina is commonly known as rawa or sooji.


Semolina is a type of course- textured flour, which is made from Durum wheat. For making this bread I used wheat flour and semolina. The combination of two flours gives you super soft and little crumbly loaf with a golden crust. I particularly like my breads with some seasonings like sesame seeds, oregano, crushed garlic  etc. If you are looking for a flavorful and soft loaf this will be a perfect choice. It’s just heaven!!!

INGREDIENTS

Whole wheat flour 1 and 1/4th cup
Semolina (fine)        2 cups
Sugar (white)             2tbsp
Salt                             1tbsp
Yeast                          1tspn (instant yeast)
Water                         1 and 1/4th cup OR 310ml
Butter/olive oil         3tbsp
Extra wheat flour/semolina, to make the dough smoother while kneading
Extra water if needed, 2-3tbsp
Sesame seeds, Chia seeds  and oregano leaves for seasoning, this is totally optional.

To make a garlic butter mixture - Garlic+ fresh chopped coriander+ butter
(In a grinder, paste, the garlic and coriander leaves, add this paste into melted butter, and  give a nice mix)

Mixture of garlic, coriander, oregano and butter


METHOD

1 Add all the dry ingredients along with dry oregano leaves. Give a nice mix.
Dry ingredients

2 Add water and oil. Mix with a spatula (do not knead), you can add 1-2tbsp more water, if needed.
Add liquids

3 Keep the dough aside for at least 15 minutes.
Let the dough rest for 15 minutes

4 After 15 minutes start kneading the dough, using the stretch & fold method.
Start kneading

5 Keep the dough in greased bowl, cover the bowl with kitchen towel, leave it in warm place for 1 hour or until doubled in volume.
Let the dough rise

6   Now, after the first rise, punch the dough and again knead it for at least 5 minutes.

After first rise, punch the dough


7 Flatten out the dough with a rolling pin, apply garlic+ coriander leaves+ butter+ oregano leaves mixture evenly.


8 Now, roll the bread from one end to another, give a shape like a log, seal the edges and both the ends.

Log shaped dough

9 Place the log shaped dough in a greased loaf tin, place the sealed edges downwards to the tin.

Dough in loaf tin

10 Place the dough for second rise or proof for 1 hour or till reaches the rim of the tin. 

After second rise

11 Season the bread log with seasonings like sesame seeds, Chia seeds or oregano. Apply melted butter.

Seasonings on top

12   In preheated oven, bake the bread log at 180 degree Celsius for 40 minutes or till you get the golden-brown crust.

Beautiful golden crust 

13 Remove the bread from the oven and apply butter on top. Let it cool down completely on wire rack before slicing.


Tips & tricks for making a perfect loaf

1. Kneading can be quite tough and challenging for newbies. So, before kneading, dust the counter or work area with semolina or wheat flour. Because of semolina and wheat, dough becomes stretchy and gluey. So, don’t give up, keep greasing the palm and knead the dough. Gradually you will notice that dough is playing according to you, completely in control. 
2. The dough for this bread will be quite stickier than the other bread doughs. 
3. Now when to stop kneading? When you press the dough with a finger, it should bounce back, at this stage stop kneading.


4. Before kneading, Set the dough aside for 15 minutes, this step will give time for the dough to absorb the water.

This step is important

5. Yeast mixture should be nicely activated, or else prefer to use instant yeast.

Instant yeast

6. Don’t over raise the dough or log otherwise it may fall from the loaf tin.

* Temperature may vary in different ovens in making breads. Follow the recipe and make the needful adjustments on time and temperature according to your oven because different ovens work differently.

Now, you can make your own bread at home. Enjoy this semolina  and wheat flour bread with friends & family.
Let me know if you make this recipe! I’d love to hear what you think about it.

 Here is the YouTube link for making this bread https://youtu.be/V8r7m7-53hk

My website link for more  delicious recipes https://www.addanky.com/


Wednesday, August 21, 2019


                             BANANA DATES SMOOTHIE 

                      SUGER  FREE  &  VEGAN SMOOTHIE        


Smoothies are so tempting, in creditably delicious and full of flavors. There’s no better way to start the day then with a satisfying, yummy serving of blended fruits and vegetables. Smoothies are full of nutrition as well as good source of protein and lots of fibre. Smoothie breakfasts are quick and easy to make.

Banana Dates Smoothie


Smoothie recipes call for raw fruits, vegetables, nuts & dry fruits. You can always make plenty of combinations of fruits and vegetables. It’s a wholesome drink with the power of seeds, nuts, fruits & veggies. Dates and figs adds natural sweetness and nourishment.


I added flex seeds, poppy seeds and sesame seeds as additional to get the power of calcium. 


Bananas are very good for our gut health and digestive system. Dates are very beneficial in constipation. Poppy and sesame seeds are high in calcium.
Let's begin with the ingredients.

INGREDIENTS

1. 1 Ripe banana                              
2. 3-4 Soaked dates
3. 2  Soaked Figs
4. 1 tbs Peanut butter
5.  ½ tsp Flex seeds
6.  1 tbs Poppy seeds
7.  1 tbs Sesame seeds
8.  1 cup Almond milk


Power pack of seeds


Dates, banana & peanut butter

Prepration

1. Powder the dry ingredients like poppy, sesame and flex seeds.
2. Place all the ingredients in a blender and blend on high speed until smooth.
3. Serve with a sprinkle of chia seeds and consume immediately.
Top it with chia seeds or flex seeds

RECIPE NOTES 

Soak dates and figs overnight. You can always use fresh coconut water instead of almond milk.
Soaked dates and figs

 keep these breakfast smoothies as healthy and nutritious as possible.

Do not add extra sugar as some fruits, dates and figs have natural sugar and perfectly works as a sweetener.

Did you make this recipe ?? 
If you give this recipe a try, let me know !!

My Youtube link : https://youtu.be/UfYsmdj-zk8

My Website link   https://www.addanky.com/recipes


Tuesday, May 21, 2019

                                MANGO WATERMELON  SUMMER                                                           DRINK/JUICE


Such a delicious combination of mango & watermelon. Which is healthy and tasty too. In hot n humid weather fruit juices n smoothies are definitely a better and good option to have instead of having sugary drinks. 


Mangoes help to control blood sugar and blood pressure levels in body. Mangoes are very healthy and nutritious but has different vitamin content also. Watermelon which is full of Lycopene. Fruits which have Lycopene content has antioxidant properties that can help prevent cell damage, prevent diseases like Cancer. These fruits also add natural sweetness to the summer drinks.  


Very refreshing drink, easy to make and the best part of this drink is that you don’t need to measure any ingredients just as we do for other recipes, you don’t need to be a Mr. Perfectionist. It’s always so fun, experimenting with variety of fruit combinations for making juices and smoothies or shakes. Today I have made a cool, refreshing summer drink with the combination of sweet mangoes and watermelon.


Let’s have a quick look on Ingredients


1 large mango
1 & ½ cup watermelon
Fresh homemade cream
Ice cubes
* Add Sugar if you need  more sweetness ( I didn’t add any sweetener to make this recipe )

Preparation

How to make  mango and watermelon juice...

1. Wash the mangoes and watermelon, peel off.

2. Dice or chop the watermelon and mango separately.

3. Blend mango cubes along with ice and puree them.

4. Same process with watermelon, blend and puree them too.

5. Half fill the mango puree in a serving glass or jar.

6. Now slowly pour the watermelon juice on it with the help of a spoon or directly.

7. On the top pour some fresh cream or half-melted ice cream of your choice and flavor.


8. Give the final touch with the garnish of chopped mangoes, watermelon and chia seeds.


NOTES

1. Avoid using extra sweeteners to the juice as these fruits contains natural sweetness.
2. Blend the fruits separately until smooth.
3. You can add tender coconut water to it to raise the nutritional value of this juice.
4. Use fresh fruits to make smoothies or any sort of juices.
5. Mango requires more liquid or water as it’s a pulpy fruit, so I added watermelon. Mango puree becomes thick in volume once blended.  You can add water or coconut water to it to get the more liquid consistency.


Enjoy your summer with this refreshing drink…
Stay healthy and hydrated.

If you have tried this recipe, do tell me about your experience. 

Youtube link for this recipe  https://youtu.be/ZGJ-Xy1IQ7Y

My website link  https://www.addanky.com/


Tuesday, May 7, 2019

                 WHOLE WHEAT  CHOCOLATE CHIPS COOKIES


Whole wheat cookies are not just great in taste as well as these are good biting snacks for toddlers. WW cookies are also healthy and nutritious. We can also add dry fruits & nuts to it, to increase the goodness & nutrient value.
If kids are fussy and finicky then just grind or powder the dry fruits and nuts and add into the dry ingredients. (a clever tip from a struggling mom of fussy kids)


Okey, this is such a easy recipe, you need a handful of easy ingredients, am sure which you already have in your kitchen cupboard. 

These tea time cookies go well with evening tea or morning coffee. Biscuits and cookies are one of the greatest combination for tea time or tea parties. This WW cookies are one of the simplest and easiest cookies you will ever make. You don’t need a pre-mix or any other fancy equipment for making these little healthy cookies, just a handful of ingredients and your choice of nuts & dry fruits. These cookies were my attempt or you can say my experiment which turned out pretty yum that I couldn't resist my self stopping with just one cookie.


Taste and texture: Nothing can beat these cookies in taste as they are made up of WW.
Crispy crust and chewy and soft on the inside.

Without taking more time, I will take you guys to the recipe and ingredients…


 Let’s have a look to the required INGREDIENTS


Wheat flour 1 and 1/4th cup
Cocoa powder 1 and ½ tbsp
Brown sugar 1 cup
White Chocolate chips 1 cup
Raisins ½ cup
Corn starch 1 tbsp
Baking soda ½ tsp
Salt ½ tsp


 1 Whole egg
 Butter ½ cup
 Vanilla essence 1tsp
 Milk if needed


My way of baking METHOD

1. Cream the butter and sugar with the help of a whisker till the sugar is completely blended with butter. Mixture should look light and fluffy.


Cream butter and sugar
Light and fluffy

2. Add a large egg and vanilla extract and keep stirring till all the ingredients are uniformly mixed.


Whole egg and vanilla extract

3. Wet ingredients mixture is ready.

4. Sift the dry ingredients and add into the butter sugar mixture.
Cocoa powder,corn starch,baking soda & salt

Wheat flour

5. Finally add raisins and white Chocolate chips & give it a stir.
White chocolate chips & raisins

6. Do not knead, just combine smoothly to form a dough.


Cookie dough

7. If the dough is really tight and thick, add one or two tbsp. of milk just to loosen the dough.

8. Scoop out the dough, roll into a ball. flatten them with spoon or rolling pin.

9. Place these flatten cookies into a lined cookie tray. (I flatten the cookie balls after baking of 8 minutes, again kept it for further baking.)
Cookie balls

10. Bake these cookies in pre-heated oven for 15-18 minutes at 160 degree C or till they turn slightly golden.

11. Let them cool completely, cookies will be little soft when hot but soon cookies will turn crunchy and chewy when cooled.


Crispy crunchy & chewy

NOTE:  You can flatten the cookie dough before putting it in oven or else let it bake for 5-8 minutes then take out the tray and flatten them with a spoon, again bake them for 10 minutes or until turn crispy. 

Whole wheat flour makes the cookies little dense.

When the cookies are baked, it cracks on top which is quite normal, gives a nice crispy crust on top and bottom and chewy inner side.


Recipe tips

1. All ingredients should be in room temperature specially butter and egg.
2. Here am using wheat flour, alternatively you can use plain flour too.
3. If cookie dough is really tight, add 1-2 tbsp. of milk, one spoon at a time.
4. Time and temperature may vary for different ovens.
5. Adjust the recipe as per your preference.


Hope you will give this a try and let me know how it turns out for you. 
                         !!Bake with love ❤️ ❤️!!


For more recipes, follow me on youtube https://www.youtube.com/channel/UCJQmHol7XFT7roOcSQ6f9xw?view_as=subscriber

Youtube link for this recipe https://youtu.be/XU5geC2z7as


My website https://www.addanky.com/